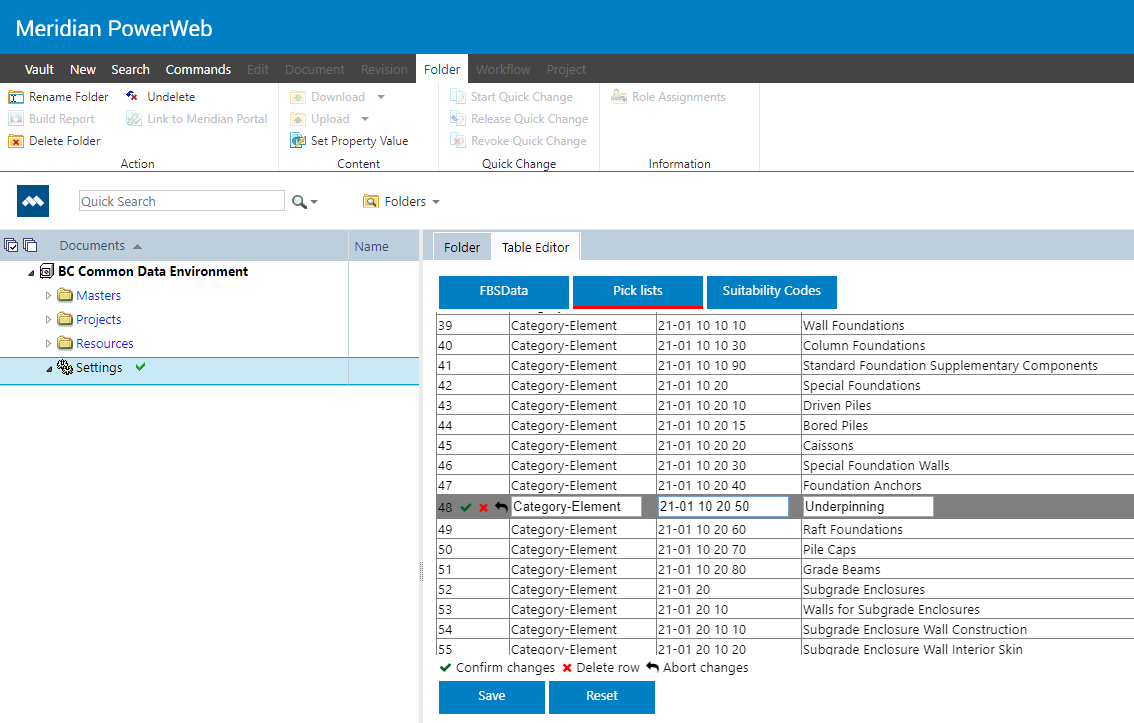
The Table Editor external property page provides a user interface that allows you to edit the data in tables and single-table queries in a Meridian configuration.
Introduction
This article provides an example that shows how you can create an external property page that provides a user interface in the Meridian clients to edit Meridian vault lookup table data.
This example requires programming experience with the Meridian Enterprise .NET API SDK and requires Microsoft .NET Framework 4.5.
You can download:
- a .zip file containing a sample Visual Studio solution.
- a .zip file containing a .met file with a configuration that you can use to test the sample solution.
Deployment and configuration
Deployment
To deploy the Related Documents external page:
- Download the .zip file.
- Unpack the contents of the .zip file to a new folder named TEDIT that is a sub-folder of the wwwroot folder on the Meridian (IIS) web server. It must be possible to create a DCOM connection from the IIS server to the Meridian application server.
-
After copying the files, add the subfolder as an application in IIS Manager.
In the Add Application dialog:
-
In Alias, enter TEDIT.
-
In Physical path, enter the path to the TEDIT folder.
-
Configuration
External page URL
Add the following code to the VBScript block of the target vault:
Dim bDebugMode
bDebugMode = False

Function PageURL (PageName, Parameters)
  Dim sRootURL
  If bDebugMode Then
    sRootURL = "http://localhost:60220/"
  Else
    sRootURL = Replace(Vault.RootURL, "Meridian", "" )
  End If

  PageURL = sRootURL & PageName & _
    "?Vault=" & Vault.ServerName & "\" & Vault.DataStoreName &
    "\" & Vault.Name & _
    "&ID=" & Document.ID & IIf (Parameters = "", "", "&") &
    Parameters
End Function
The global variable bDebugMode can be used to enable debugging of the external page. The expression "http://localhost:60220/" should be adapted to point to the IIS server used by Visual Studio. Note: further logic may be necessary to calculate the debugging URL, for example, by removing a sub-folder from the PageName argument, depending on which IIS server is used for debugging.
External page
To show the external page in the Meridian clients:
-
Create a custom property page in Meridian Configurator and enable the Use external URL option. For the external URL, specify the following expression:
PageURL ("TEDIT/Main.aspx", "Tables=MyTable1,MyTable2")The value of Tables parameter is a comma-separated list of the internal names of the tables that are presented to the user.
- Assign the external page to the relevant document types or folder types.
Solution design
Overview
The buttons to select the Meridian table are implemented as an asp:Repeater to give detailed control over the layout and behavior. To select a table, each button calls a javascript function that refreshes the page with a query string parameter that specifies the selected table. The code-behind uses this parameter to fetch the data that the user wants to see or edit.
The solution uses a standard ASP.Net asp:GridView to display the data. The GridView supports a variable number of rows and columns, so no additional coding is required to display data from tables with different numbers of columns. The columns are set by adding them to a DataTable in the code-behind and then binding this DataTable to the asp:GridView.
Editing is implemented by javascript that manipulates the content of the selected row in the HTML Table that is rendered from the asp:GridView. Updates to the data (edited values, rows added and rows deleted) are recorded by the javascript in a form value which is posted back to the server when the user clicks the Save button. The posted value is processed in the code-behind and used to update the table data in Meridian.
Framework
The solution is created as a Windows Forms application in Visual Studio 2012 and uses the .NET 4.5 framework.
ASPX page
Table selector
The table selector is presented as a table with one row with a cell for each table that is configured for display. The cells are generated by an <asp:Repeater> element. The data is fetched from a DataTable. Each cell contains a <div> that displays a button. The class of the button (showing it as the active table or not) and the name of table are fetched from the DataTable.
Data table
The data of the selected table is presented using a <asp:GridView> element contained in a <div> that defines a scrollable region that fills the available page area.
Footer/buttons
The footer is shown in a hidden <div> that is made visible only when a table is selected.
Data updates
The data to process updates is stored in an <input> element where it can be posted back to the server.
Code behind
Select table
After opening the vault, the DataTable to populate the table selector is created and filled with the names of the tables specified in the query string parameter Tables. Then it is bound to the repeater in the ASPX page.
Fetch data
If the query string parameter Table has a value, the data for the indicated Meridian table is fetched.
First, the columns of the table are queried using the ColumnsInfo method of the BCSTable object. These are then added to the DataTable to hold the data. After processing of the updates (see below), all data from the table is queries and added to the DataTable. The DataTable is then bound to the GridView in the ASPX page.
Process updates
Updates are posted as a string in the following format:
<row>~!~<row>
where <row> is
<old values>~@~<new values>
and values are
<value>~~<value>
This string is split, after which old values are used to identify a row (empty means a new row) and new values are used to update the row (empty means delete the row).
Javascript
Select Table
The table is selected by refreshing the page with the query string parameter Table set. The parameter Tables is set using the value from the current page.
Support functions
rowNumber– calculates the row number from the currently select row in the HTML tablesetRowCellsClass– sets the CSS class to highlight the rowenterRow– highlights the row on hoveringexitRow– removes the highlight
Start/finish row edit
When the user clicks in the table, a function checks if the user is currently editing a row. If not, it will replace the cell values with <input> elements and add control icons to the first cell. If the user is editing the current row, it will detect which control icon is clicked and handle the request.
Recording updates
These functions add data to the <input> element to record adding or deleting a row or updating the values.
Save/reset data
These functions refresh the page and post the updates when the user wants to save. The update data is processed in the code behind.
Initialization
The onLoad function sets the event listeners for the elements on the page.