Configure a Third-Party Identity Provider
Single sign-on (SSO) is a technology that allows one system that acts as an identity provider (IDP) to authenticate the users of another system that acts as a service provider (SP). Users must have accounts in the IDP system but do not need to have accounts in the SP system. Examples of IDPs are: Google, Microsoft, and Facebook. Examples of SPs are any applications that allow you to log on to them after you first log on to an IDP that they support. For more information about SAML, see What is SAML and How Does It work?
Meridian Cloud supports one configurable, third-party IDP in addition to its standard unconfigurable IDPs: Google, Microsoft, and Azure Active Directory. Meridian Cloud is compatible with any IDP that supports the Security Assertion Markup Language version 2 (SAML2) protocol.
After the configurable IDP has been set up in Portal, that IDP will appear in the list of available IDPs that is presented to users when they log on to Portal as described in Sign In to Meridian Cloud. To register one or more identity providers for the same user account, see Manage User Accounts.
Configuring a SAML IDP requires:
-
SP-initiated (Meridian Cloud outbound) authentication. Meridian Cloud does not support IDP initiated (Meridian Cloud inbound) authentication.
-
To perform the tasks described on this page, you must be assigned to the Tenant Administrator role.
This task also requires that information from both systems (IDP and SP) be entered into each other in order to establish a secure trust relationship between the two systems. Configuring only one of the providers is not enough to make it work. Therefore, both systems should be configured at approximately the same time.
Some of the information that you need to configure in Meridian Cloud is automatically generated by the IDP when you configure the IDP for Meridian Cloud and is unique to the trust between the two systems. Other information that needs to be configured is common definitions for the user name and email address attributes that uniquely identify users in both systems. These attributes are passed back and forth between the systems during the authentication process and so they need to agree on the format of the attributes.
The exact procedure for configuring an IDP is different for each IDP but the names of the configuration settings are typically similar. Therefore, these instructions should work in general for any IDP. For more detailed help with configuring your chosen IDP, refer to the their documentation and support. Accruent does not provide further support for how to configure the IDP.
The following instructions begin this task in Meridian Portal but the task can also be started in the IDP. The order in which the information is entered into the two systems is not critical, only that it is done correctly.
Important!
-
Changing identity provider settings after users have already accepted invitations to join projects will invalidate their current authentications and prevent them from logging in again. You will need to re-invite them and they must accept the new invitation before they can log in again.
-
Do not set an IDP in a way that includes special characters in user names. This can cause errors.
-
Since user synchronization on the Meridian Cloud VM is based on the user name, it is not possible to change a user name from the tenant Account Settings. This would break the link with the existing Meridian user.
To enable a standard identity provider:
-
On the Meridian Portal Landing page, at the bottom of the navigation bar, click the Account Settings icon  .
.
The Account Settings page appears.
-
In the menu, click Authentication.
The Authentication page appears and lists the current status of all IDPs.
-
Click the toggle icon  of the provider that you want to use to switch it to its enabled state
  .
.
To configure a custom third-party identity provider in Meridian Portal:
-
On the Meridian Portal Landing page, at the bottom of the navigation bar, click the Account Settings icon .
The Account Settings page appears.
-
In the menu, click Authentication.
The Authentication page appears and lists the current status of all IDPs.
-
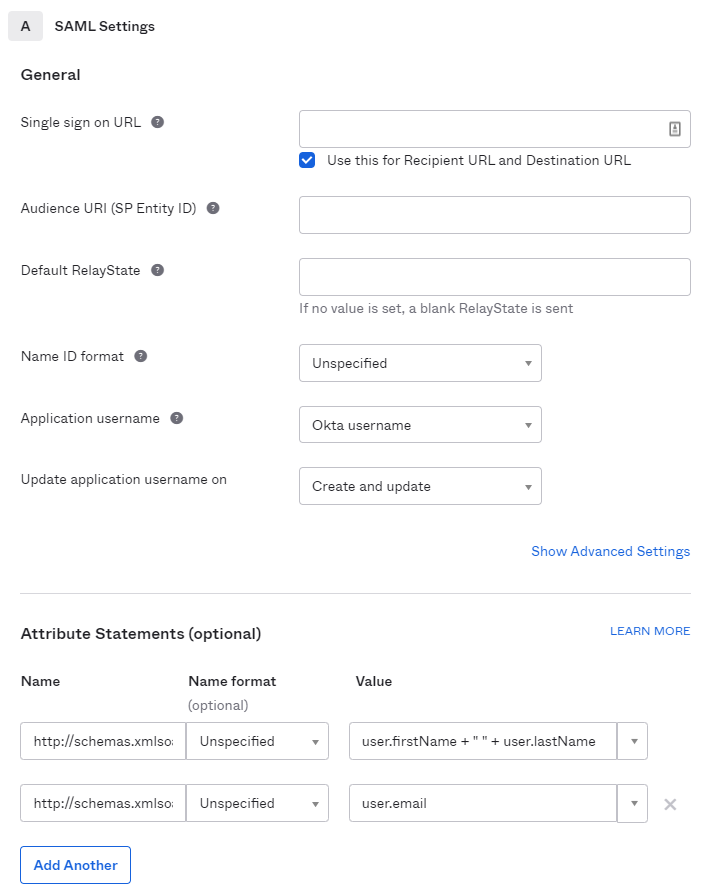
In the SAML Settings group, hover the mouse pointer over the URL that is shown for Audience.
-
Click the Copy icon  to copy the URL to the clipboard.
-
Log on to administration tool of the IDP and navigate to the list of applications that are registered to use that IDP.
-
Open the application registration that represents Meridian Cloud or create a new application registration entry.
-
Find the SAML configuration area of the application registration.
For example, the settings may look similar to the screen shot below.
-
Paste the clipboard contents into the audience setting.
For example, Audience URI in the preceding picture.
-
Return to the Meridian Portal Authentication page and copy the URL in Single Sign-On URL to the clipboard like you did in step 4.
-
Return to the IDP configuration page and paste the contents of the clipboard into the corresponding setting.
For example, Single sign on URL in the preceding picture.
-
In the IDP configuration page, find the attribute definition settings.
For example, Attribute Statements in the preceding picture.
-
Ensure that the following attributes are defined correctly.
Create them if necessary. They define the name and email address that will be used for each user in Meridian Cloud since they do not have accounts there.
Users who attempt to log on to Meridian Cloud when these attributes are not properly configured will cause error messages like: We don't have an account for...
The following are examples of expected formats:
Attribute options
|
http://schemas.xmlsoap.org/ws/2005/05/identity/claims/name
|
user.firstName + " " + user.lastName |
| http://schemas.xmlsoap.org/ws/2005/05/identity/claims/emailaddress
|
user.email |
-
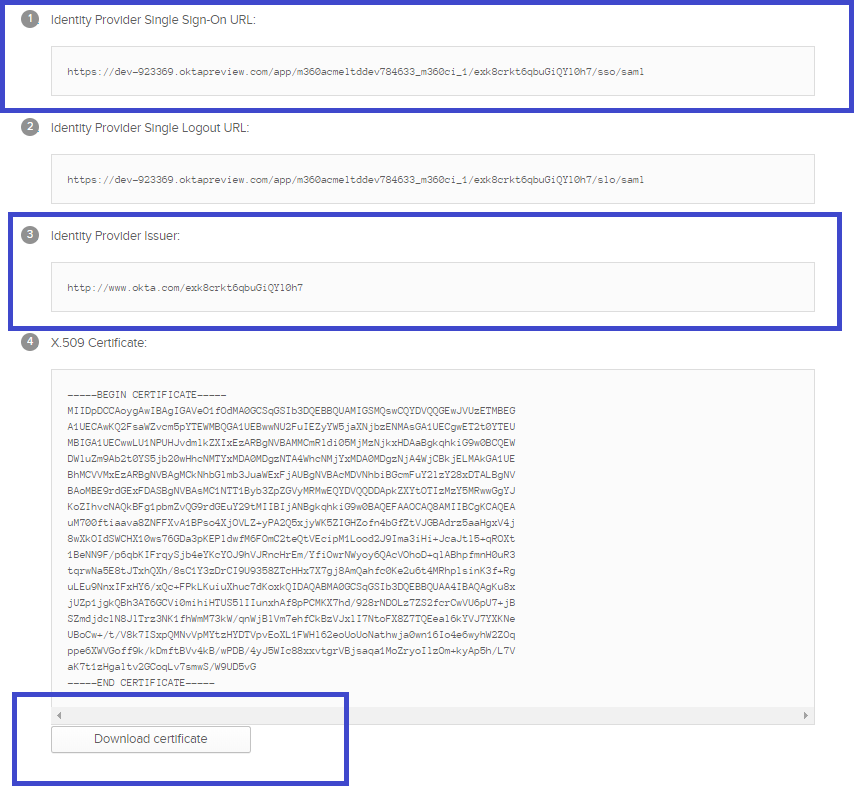
In the IDP configuration page, find and click the download button or link (Download certificate in the following picture).
To avoid an error, the certificate must be signed with the stronger SHA256 encryption, not SHA1A. The certificate file downloads to your PC. You will upload this file to the Meridian Portal Authentication page in step 20.
-
Find the single sign-on URL text (not the setting in step 10) and copy it to the clipboard.
For example, Identity Provider Single Sign-On URL in the preceding picture.
-
Return to the Meridian Portal Authentication page.
-
In the SAML Settings group, click the toggle icon to enable and configure SAML authentication.
The SAML Authentication dialog box appears.
-
Type a descriptive name in Name as you want it to appear to users on the logon page described in Sign In to Meridian Cloud.
-
Paste the contents of the clipboard into Single Sign-On URL.
-
Return to the IDP configuration page and find the issuer text and copy it to the clipboard.
For example, Identity Provider Issuer in the preceding picture.
-
Return to the Meridian Portal SAML Authentication dialog box and paste the contents of the clipboard into Issuer (Entity ID).
-
Click  Upload next to X.509 Certificate and select the certificate file that you downloaded in step 13.
-
Next to SO Request Binding Type, select the option that best meets your organization's standard. If you are unsure, select POST.
-
Click Save.
The SAML Authentication dialog box disappears.
-
In the SAML toolbar, click Test to test the current settings.
You must resolve any discrepancies before the single sign-on will work.
Note:
When electronic signatures are enabled as described in Configure Signature Watermarks, Meridian Portal sets two parameters in SAML requests that can be used by the IDP to force re-authentication upon workflow transitions: ForceAuthn and PasswordProtectedTransport. In the code sample below, you can see these parameters in a request:
Copy
<samlp:AuthnRequest ForceAuthn="true" [...]>
    <samlp:RequestedAuthnContext Comparison="exact">
        <saml:AuthnContextClassRef>
            urn:oasis:names:tc:SAML:2.0:ac:classes:PasswordProtectedTransport
        </saml:AuthnContextClassRef>
    </samlp:RequestedAuthnContext>
    [...]
</samlp:AuthnRequest>
Meridian Portal alone cannot ensure FDA compliance. If your organization uses Microsoft Azure as its identity provider, it is your responsibility to make sure that the dual authentication configuration satisfies FDA guidelines. If your organization uses a different identity provider, it is your responsibility to make sure its configuration satisfies FDA guidelines. For more information, see How ForceAuthn Works in Different Authentication Modes.