A standalone tool is installed with Meridian Enterprise to configure these Meridian clients to work with any OpenId compatible identity provider:
-
PowerWeb
-
Application Integration (site cache web server and site cache client)
-
Remote CAD links
The tool allows you to enter and test authentication details in a simple graphical user interface and to enable or disable authentication for specific clients. You should understand how to also configure an on-premises firewall to allow inbound connections if required.
-
To request the client secret and client ID that will be generated by the Meridian CloudOps Team, open a support case with the information below:
-
IssuerUri – https://auth-prd.meridiancloud.net/auth (change it to .eu if you have a tenant in Europe).
-
M360Tenant – your Meridian Tenant unique name
-
M360Domain – meridian360.com (change it to .eu if you have a tenant in Europe).
-
PowerWebAppUrl – http://localhost/meridian
This PowerWeb URL must be accessible externally from outside your network.
-
ExplorerWebAppUr – http://localhost/BCEnterprise
This Explorer URL must be accessible from outside your network.
-
-
To use OpenId Connect, you don't need to have the Meridian clients (PowerWeb, Explorer and Enterprise Server) accessible from outside your corporate network.
To configure authentication:
-
On the Meridian Enterprise server, run C:\Program Files\BC-Meridian\Program\SAMLConfigurator\SAMLConfigurator.exe.
The tool window opens.
-
Click options or type values using the descriptions in the following table.
-
Click Apply and Continue.
The Meridian Cloud logon page opens in a browser window.
-
Select an authentication provider and enter valid credentials.
-
When you have successfully configured and tested authentication, click the Enable button for each client for which you want to enable OpenId authentication. See the example below:
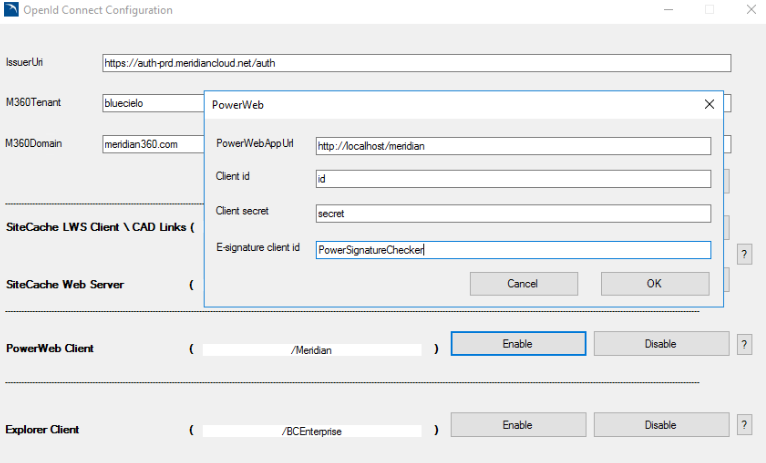
-
Enter the client secret and client id provided by Support.
-
Enter the other appropriate information.
-
Click OK.
-
Repeat these steps until the process is complete.
The authentication options are saved for the corresponding clients.
-
Select the Meridian groups option as described in Configure the EDM Server Service.
-
For more information or to manually configure authentication, click the corresponding help button (?) in the tool.
Instructions will open in a new window.
| Option | Description |
|---|---|
|
IssuerUri |
https://auth-ci2.meridiancloud.io/auth |
|
M360Tenant |
Your Meridian Cloud account name |
|
M360Domain |
meridian360.io |