The workflow of a project definition establishes the routing rules for documents contained within project folders made from the project definition. A workflow consists of the following elements:
-
States — Phases within a project where various types of work with the project's documents are performed by others.
-
Transitions — Actions within a project that change the current state of the project from one state to another.
To create the workflow for a project definition:
-
Select the desired project definition in the configuration tree in the left pane of Meridian Enterprise Configurator.
-
Click the States tab in the right pane.
The current workflow diagram displays in the right pane.
-
Click the Edit button to enable modification of the project definition.
-
Use the buttons on the States tab to add to or remove intermediate states, end states, and transitions from the workflow diagram until it represents the business process of the type of project the project definition will represent.
-
Click the OK button on the States tab.
The following figure shows the available toolbar buttons.
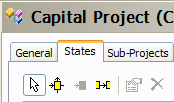
The buttons have the following purposes:
-
 Selection cursor — Use to select an element for editing or to move the element. Becomes the current tool after any of the other buttons are used.
 -
 Create new intermediate state — Click the button, point to an empty location in the workflow diagram, and click again to place a new intermediate state.
 -
 Create new end state — Click the button, point to an empty location in the workflow diagram, and click again to place a new end state. Enabled only when the workflow has no end state.
 -
 Create new transition — Click the button, click the originating state, then click the destination state to add a transition between the two states. The workflow will follow the direction of the transition arrowhead that is created.
To create a transition with other than a straight line between its two states, use one of the following options:
-
Create a straight transition line between the two states as described above, then click and drag the transition label to a new location in an open area of the workflow diagram.
The transition line will stretch to follow the transition label to its new location.
-
After clicking the originating state, click at points in an open area of the workflow diagram to insert intermediate vertices in the transition line before clicking the destination state.
The transition line will follow the points and the transition label will be located in the middle of the resulting line.
-
-
 View properties — Click to display the properties of the selected element. This command is also available by right-clicking the selected element.
 -
 Delete selection — Click to delete the selected element. This command is also available by right-clicking the selected element.
The buttons can also be identified by the tooltip that displays when you hover your cursor over the button.
The commands are not persistent for repeated use. That is, after using each command once, the selection cursor becomes the current tool. To use the same command again, you must click the button again.
You will also find the state and transition commands on the context menu by right-clicking in any open area of the workflow diagram.
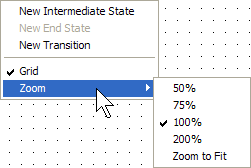
The workflow editor provides tools to help you draw the workflow. The tools can be found on the context menu displayed by right-clicking in any open area of the workflow diagram, as shown in the following figure.
-
Grid — Displays a grid of dots to help you align elements.
-
Zoom — Offers preset magnification levels to view more or less of the current workflow diagram.
This completes creation of the workflow diagram of a project definition. You can now continue to configure the workflow in any of the following topics.